Installation
ghini.desktop is a cross-platform program and it will run on unix machines like GNU/Linux and MacOSX, as well as on Windows.
one-liner for hurried users.
Linux users just download and run the installation script. You may read the documentation later.
Windows users in a real hurry don't the instructions and use a recent Windows installer. You do not miss any functional feature, but you have less chances to contribute to development.
Mac users are never in a hurry, are they?
Ghini is maintained by very few people, who focus on enhancing its functional parts, more than on writing fancy installers. Instead of several native installers we offer a single cross-platform installation procedure. This has a few big advantages which you will learn to appreciate as we go.
The installation is based on running a script.
- The GNU/Linux script takes care of everything, from dependecies to
installation for users in the
ghinigroup. - The Windows script needs you to first install a couple things.
- On MacOSX we use the same script as on GNU/Linux. Since OSX has no default package manager, we install one and we use it before we start the script.
Following our installation procedure, you will end with Ghini running within a Python virtual environment, all Python dependencies installed locally, non conflicting with any other Python program you may have on your system.
Dependencies that don't fit in a Python virtual environment are: Python, virtualenv, GTK+, and PyGTK. Their installation varies per platform.
If you later choose to remove Ghini, you simply remove the virtual environment, which is a directory, with all of its content.
Installing on GNU/Linux
Open a shell terminal window, and follow the following instructions.
Download the devinstall.sh script:
Invoke the script from a terminal window, starting at the directory where you downloaded it, like this:
bash ./devinstall.sh
The script will produce quite some output, which you can safely ignore.
global installation
When almost ready, the installation script will ask you for your password. This lets it create a
ghiniuser group, initialise it to just yourself, make the just createdghiniscript available to the wholeghiniuser group.If feeling paranoid, you can safely not give your password and interrupt the script there.
Possibly the main advantage of a global installation is being able to find Ghini in the application menus of your graphic environment.
You can now start ghini by invoking the
ghiniscript:ghiniYou use the same
ghiniscript to update ghini to the latest released production patch:~/bin/ghini -u
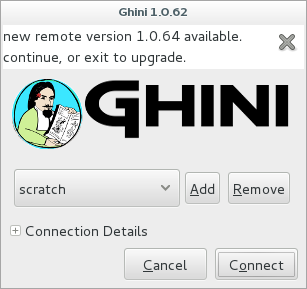
This is what you would do when ghini shows you something like this:
Users of the global installation will also type
ghinito invoke the program, but they will get to a different script, located in/usr/local/bin. This globally availableghiniscript cannot be used to update a ghini installation.Again the same
ghiniscript lets you install the optional database connectors: option-pis for PostgreSQL, option-mis for MySQL/MariaDB, but you can also install both at the same time:~/bin/ghini -pm
Please beware: you might need solve dependencies. How to do so, depends on which GNU/Linux flavour you are using. Check with your distribution documentation.
You can also use the
ghiniscript to switch to a different production line. At the moment1.0is the stable one, but you can select1.1if you want to help us with its development:~/bin/ghini -s 1.1
beginner's note
To run a script, first make sure you note down the name of the directory to which you have downloaded the script, then you open a terminal window and in that window you type bash followed by a space and the complete name of the script including directory name, and hit on the enter key.
technical note
You can study the script to see what steps if runs for you.
In short it will install dependencies which can't be satisfied in a virtual environment, then it will create a virtual environment named
ghide, use git to download the sources to a directory named~/Local/github/Ghini/ghini.desktop, and connect this git checkout to theghini-1.0branch (this you can consider a production line), it then builds ghini, downloading all remaining dependencies in the virtual environment, and finally it creates theghinistartup script.If you have
sudopermissions, it will be placed in/usr/local/bin, otherwise in your~/binfolder.
Next...
Installing on MacOSX
Being macOS a unix environment, most things will work the same as on GNU/Linux (sort of).
First of all, you need things which are an integral part of a unix environment, but which are missing in a off-the-shelf mac:
- developers tools: xcode. check the wikipedia page for the version supported on your mac.
- package manager: homebrew (tigerbrew for older OSX versions).
Installation on older macOS.
Every time we tested, we could only solve all dependencies on the two or three most recent macOS versions. In April 2015 this excluded macOS 10.6 and older. In September 2017 this excluded macOS 10.8 and older. We never had a problem with the lastest macOS.
The problem lies with homebrew and some of the packages we rely on. The message you have to fear looks like this:
Do not report this issue to Homebrew/brew or Homebrew/core!The only solution I can offer is: please update your system.
On the bright side, if at any time in the past you did install ghini.desktop on your older and now unsupported macOS, you will always be able to update ghini.desktop to the latest version.
With the above installed, open a terminal window and run:
brew doctor
make sure you understand the problems it reports, and correct them. pygtk will need xquartz and brew will not solve the dependency automatically. either install xquartz using brew or the way you prefer:
brew install Caskroom/cask/xquartz
then install the remaining dependencies:
brew install git
brew install pygtk  # takes time and installs all dependencies
follow all instructions on how to activate what you have installed.
In particular, make sure you read and understand all reports starting with
If you need to have this software.
You will need at least the following four lines in your ~/.bash_profile:
export LC_ALL=en_US.UTF-8
export LANG=en_US.UTF-8
export PATH="/usr/local/opt/gettext/bin:$PATH"
export PATH="/usr/local/opt/python/libexec/bin:$PATH"
Activate the profile by sourcing it:
. ~/.bash_profile
Before we can run devinstall.sh as on GNU/Linux, we still
need installing a couple of python packages, globally. Do this:
sudo -H pip install virtualenv lxml
The rest is just as on a normal unix machine. Read the above GNU/Linux instructions, follow them, enjoy.
As an optional aesthetical step, consider packaging your ~/bin/ghini
script in a platypus
application bundle. The images directory contains a 128×128 icon.
Next...
Installing on Windows
The steps described here instruct you on how to install Git, Gtk, Python, and the python database connectors. With this environment correctly set up, the Ghini installation procedure runs as on GNU/Linux. The concluding steps are again Windows specific.
Note
Ghini has been tested with and is known to work on W-XP, W-7 up to W-10. Although it should work fine on other versions Windows it has not been thoroughly tested.
The installation steps on Windows:
download and install
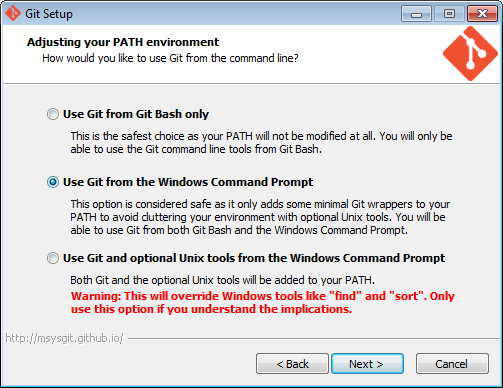
git(comes with a unix-likeshand includesvi). Grab it from the Git download area.all default options are fine, except we need git to be executable from the command prompt:
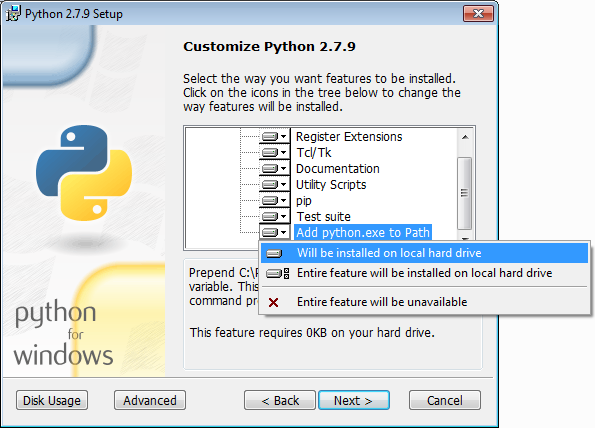
download and install Python 2.x (32bit). Grab it from the Python official site.
When installing Python, do put Python in the PATH:
download
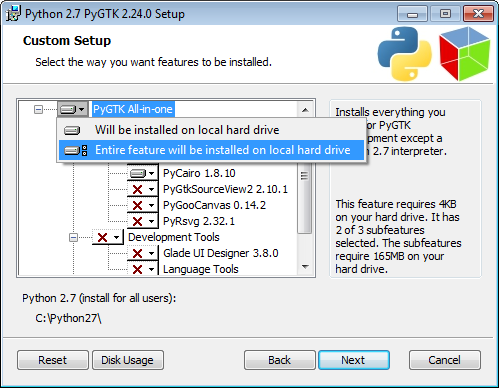
pygtkfrom the official source. (this requires 32bit python). be sure you download the "all in one" version.Make a complete install, selecting everything:
(Possibly necessary, maybe superfluous) install lxml, you can grab this from the pypi archives
Remember you need the 32 bit version, for Python 2.7.
(definitely optional) download and install a database connector other than
sqlite3.If you plan using PostgreSQL, the best Windows binary library for Python is psycopg and is Made in Italy.
REBOOT
hey, this is Windows, you need to reboot for changes to take effect!
We're done with the dependecies, now we can download and run the batch file:
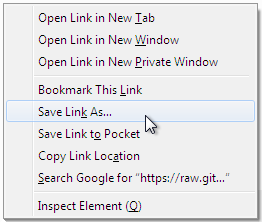
Please don't just follow the above link. Instead: right click, save link as...
Also make sure you don't let Windows convert the script to a text document.
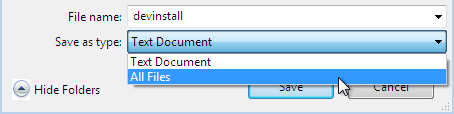
Now Open the script to run it. Please note: in the below image, we have saved the file twice, once letting Windows convert it to a text document, and again as a Windows Batch File. Opening the batch file will run the script. Opening the text document will show you the code of the batch file, which isn't going to lead us anywhere.

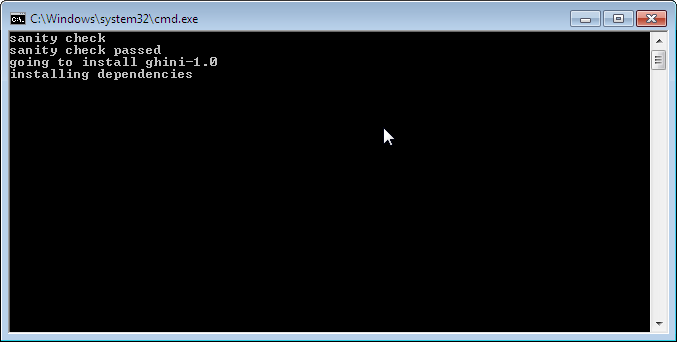
If you installed everything as described here, the first thing you should see when you start the installation script is a window like this, and your computer will be busy during a couple of minutes, showing you what it is doing.
Running
devinstall.batwill pull theghini.desktoprepository from github to your home directory, underLocal\github\Ghini, checkout theghini-1.0production line, create a virtual environment and install ghini into it.You can also run
devinstall.batpassing it as argument the numerical part of the production line you want to follow.This is the last installation step that depends, heavily, on a working internet connection.
The operation can take several minutes to complete, depending on the speed of your internet connection.
the last installation step creates the Ghini group and shortcuts in the Windows Start Menu, for all users. To do so, you need run a script with administrative rights. The script is called
devinstall-finalize.bat, it is right in your HOME folder, and has been created at the previous step.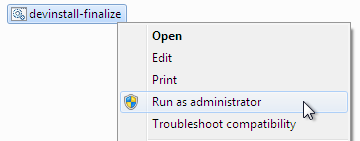
Right-click on it, select run as administrator, confirm you want it to make changes to your computer. These changes are in the Start Menu only: create the Ghini group, place the Ghini shortcut.
download the batch file, it will help you staying up-to-date:
If you are on a recent Ghini installation, each time you start the program, Ghini will check on the development site and alert you of any newer ghini release within your chosen production line.
Any time you want to update your installation, just run the
ghini-update.batscript, it will hardly take one minute.How to save a batch file, and how to run it: check the the quite detailed instructions given for
devinstall.bat.
If you need to generate PDF reports, you can use the XLS based report generator and you will need to download and install Apache FOP. After extracting the FOP archive you will need to include the directory you extracted to in your PATH.
If you choose for PostScript reports, you can use the Mako based report generator and there are no further dependencies.
Next...
Installing on Android
ghini.desktop is a desktop program, obviously you don't install it on a handheld
device, but we do offer the option, for your Android phone or tablet, to install ghini.pocket.
ghini.pocket is a small data viewer, it comes handy if you want to have a quick idea
of a plant species, its source, and date it entered the garden, just by scanning a plant label.
Installation is as easy as it can be: just look for it in Google Play, and install it.
Export the data from ghini.desktop to pocket format, copy it to your device, enjoy.